The Spring Boot Admin is a project developed by CodeCentric which is available for free at https://github.com/codecentric/spring-boot-admin so we can monitor our microservices.
In order for these micro-services to be monitored, we have 2 options:
- Placing the dependency of spring boot admin client on each project
- Or configuring the Eureka (Consul or Zookeeper) so that you can monitor the micro-services that are already registered in it.
I will explain step by step what has to be done to work with the spring boot admin in our microservices cluster. But, if you are impatient and already want to try it, here is the GitHub repository: https://github.com/joedayz/spring-boot-admin-cloud-finchley.
For my demos I will use the following projects and the following versions:
- Spring Boot 2.0.1.RELEASE
- Spring Cloud Finchley.RC1
- Spring Boot Admin 2.0.2
Spring Cloud Config
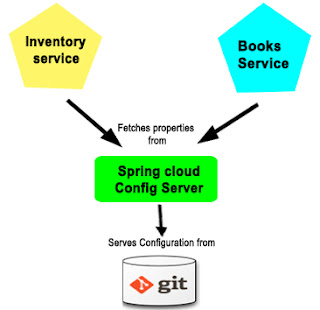
In a micro-services architecture, it is very common for the configuration to be decentralized from themselves.
That is, instead of having the configuration to BD, SMTP, JPA, Security in your micro-service along with the source code or in other words in the same JAR, this is in an external GIT repository from where your micro services owe it. Get on startup (startup) so they can run without problems.
In summary:

The Spring Cloud Config is a Spring Cloud project that fulfills this function of providing configuration to microservices via HTTP.
Create a Spring Config Server
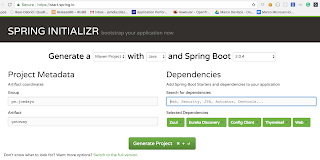
To create a configuration server we will create a spring boot project from scratch with https://start.spring.io/ with the following dependencies.
With this setup, we will have what it takes to start a Spring Cloud Config server. The next step is to configure the spring boot and spring cloud versions that I described when starting the article.
You can see the complete code in the pom.xml of the config-server.
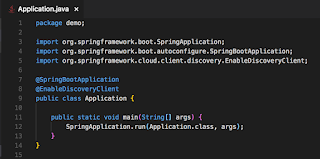
Then in the Application class, we enable the configuration server role with the annotation @EnableConfigServer.
Let's see the configuration:
We execute the project and see if it exposes the data in JSON format for any micro-service that requests it.
http://localhost:8001/application/default
The output is as follows:
With this setup, we will have what it takes to start a Spring Cloud Eureka server. The next step is to configure the spring boot and spring cloud versions that I described when starting the article.
You can see the complete code in the pom.xml of the config-server.
Then in the Application class, we enable the configuration server role with the annotation @EnableConfigServer.
Finally, we will configure the access to the GIT repository from which we will obtain the parameters. The application.yml path that will be available for my micro-services will be in this link https://github.com/joedayz/spring-boot-admin-cloud-finchley/blob/master/ConfigData/application.yml.
Let's see the configuration:
http://localhost:8001/application/default
The output is as follows:
If you have reached this point, congratulations, you already know how to create a Spring Cloud Config Server.
Spring Cloud Eureka
n a microservices architecture with Spring Cloud we have the Service Discovery Server (Discovery Server) which has the registry of all the micro-services of your architecture. The is that he knows in what server, port, number of instances of the same, current state (UP or DOWN) is the microservice. There are several in the market, but, we are going to use the Eureka.
The micro-services, in general, register themselves in the Eureka. We'll talk about that later.
Crear un Spring Cloud Eureka
To create a Eureka server we will use https://start.spring.io/ to create a Spring Boot project with the following configuration:
You can see the complete code in the pom.xml of the config-server.
To convert this project into a Eureka server we use this annotation @EnableEurekaServer.
Then, we will configure the server with basic authentication so that they can enter it using as user: eureka and password: password.
The file can be seen in this link.
We execute the project and then go to http://localhost:8010, after entering the user (eureka) and password (password) we will obtain this result.
NOTE: Here you will see the registered microservices. Here the recommendation is to have several Eureka to have high availability, because of falling the Eureka, your architecture becomes inconsistent. In this article for didactic reasons, we are only running a single eureka.
If you got to this point, congratulations, you know how to create and execute a Spring Cloud Eureka, the Discovery Server of your architecture.
If you got to this point, congratulations, you know how to create and execute a Spring Cloud Eureka, the Discovery Server of your architecture.
Example with an architecture of Micro Services
A micro-services architecture generally uses a gateway as a facade or entrance to your micro-services cluster. And it is through the gateway that we access the micro-services.
The result should be something like this:
For didactic reasons, we will make a simple solution. The gateway will show a sentence that is the result of invoking micro-services subject + verb + article + adjective + noun.
The result should be something like this:
Explained the example of @kennyk65 that in the end we will monitor with Spring Boot Admin, we will explain how to create the microservices and the gateway, which will use the spring cloud config to get their configurations and start correctly, as well as register them same in the Eureka (later we will see why this is important).
Micro Servicio
Requirements: Before creating and running the micro-services, make sure you have the Spring Cloud Config and Eureka running.
To create the microservices: subject (it will return subjects), verb (it will return verbs), article (it will return articles), adjective (it will return adjectives) and noun (it will return substantives) we use the page https://start.spring.io/ with the following dependencies:
We modified the file pom.xml with the versions of spring boot and spring cloud that we described at the beginning of the article.
From there, we configure the Spring Boot project so that it registers in the Discovery Server Eureka with the annotation @EnableDiscoveryClient.
From there, we configure the Spring Boot project so that it registers in the Discovery Server Eureka with the annotation @EnableDiscoveryClient.
The Class to model each word is as follows:
package demo;

/**
 * 'Word' object is nicely represented in JSON over a regular String.
 */
public class Word {

 public String word;

 public Word() {
  super();
 }

 public Word(String word) {
  this();
  this.word = word;
 }

 public String getWord() {
  return word;
 }

 public void setWord(String word) {
  this.word = word;
 }


}
The Micro Service when invoked via REST will return a word depending on the active profile (subject, verb, article, adjective, noun). For this, you will have to obtain a series of words or alternatives that will be assigned to the String words from the Spring Cloud Config with @Value ("$ {words}").
But, as all that is achieved, then, with the configuration that we will find in application.yml and bootstrap.yml of the project.
application.yml
It is necessary to have the reference to words so that the application does not fail. Remember that it will be the spring cloud config that will give us the real list of words according to the profile that is active.
The above described can be observed in the following configuration:
The pom.xml After making the version changes, it remains that way.
We converted this project with Spring Boot in Gateway with the annotation @EnableZuulProxy.
bootstrap.yml
This is the key configuration, which will allow us to work with the Spring Cloud Config (the URI) to obtain the words, with which service ID will be registered in Eureka and the name of the microservice and available profiles with which we can execute it.
The above described can be observed in the following configuration:
To be able to execute the micro-services with different profiles. You have the following shell to run the micro-service as subject, verb, article, adjective, and noun.
If we review the Eureka we will see all the micro-services started.
If you arrived at this point you already have 5 micro-services running and getting your configuration from the Spring Cloud Config and registered in the Eureka. Congratulations.
Gateway
The requirement for this part: The microservices words in their different profiles must be running.
It is not good practice to allow the outside world to access your microservices directly, there are no exceptions, even if they are APIs that are going to expose data out of your system. For this, the best practice is to have a Gateway. To have one there is a project called Spring Cloud Zuul which we will use in this demo that will give us the services of router and filter.
To create it also go to https://start.spring.io/ and create a Spring Boot project with this unit.
To create it also go to https://start.spring.io/ and create a Spring Boot project with this unit.
We converted this project with Spring Boot in Gateway with the annotation @EnableZuulProxy.
In the project, we will go to a view where we will call the micro-services. For that, a simple @Controller is enough.
In the sentence.html view with thymeleaf we will use jquery to make calls to services in this way:
And with Jquery call the service and place the result in the respective span.
For all this to work, the magic is again in the application.yml where we indicate whether we want to allow thymeleaf to cache or not, as well as the prefix to use when we want to call the microservices /services/verb for example.
and in the bootstrap.yml we put the name of the micro-gateway service and its association with the Spring Cloud Config.
We start the Gateway and the result should be:
If you got to this point congratulations, you know how to create a gateway.
Spring Boot Admin
And the moment arrived. At this point you will say, and where is the spring boot admin ?, return my money.
After accommodating the versions and dependencies the pom.xml remains as in previous sections.
In the same way, to convert this project spring boot into spring boot admin, we use the annotation @EnableAdminServer.
To provide some security (basic HTTP authentication) we will use the credentials: admin as user and password as the password.
Finally, in the application.yml, we do the magic: Port where it will run, the name of the application, basic HTTP security and its connection to the Eureka.
We execute the project:
(Login)
(List of microservices)
(Panel of microservices)
(complete information of the microservice)
If you got to this point. Congratulations, you know how to run a spring boot admin.
Enjoy!
Joe


Thanks for sharing this blog.This article gives lot of information.
ResponderBorrarMicroservices For Java Developers Online Training
Excellent explanation. Very clear and concise. Thank you very much. Kinemaster Gold
ResponderBorrarHappiness— May your life be filled with joy and happiness and may each new day bring you moments to cherish. Love— On this joyous day,
ResponderBorrarChristmas Message to My Husband